
Draught-Proofing a Home: Where Heat Actually Escapes and What to Do About It

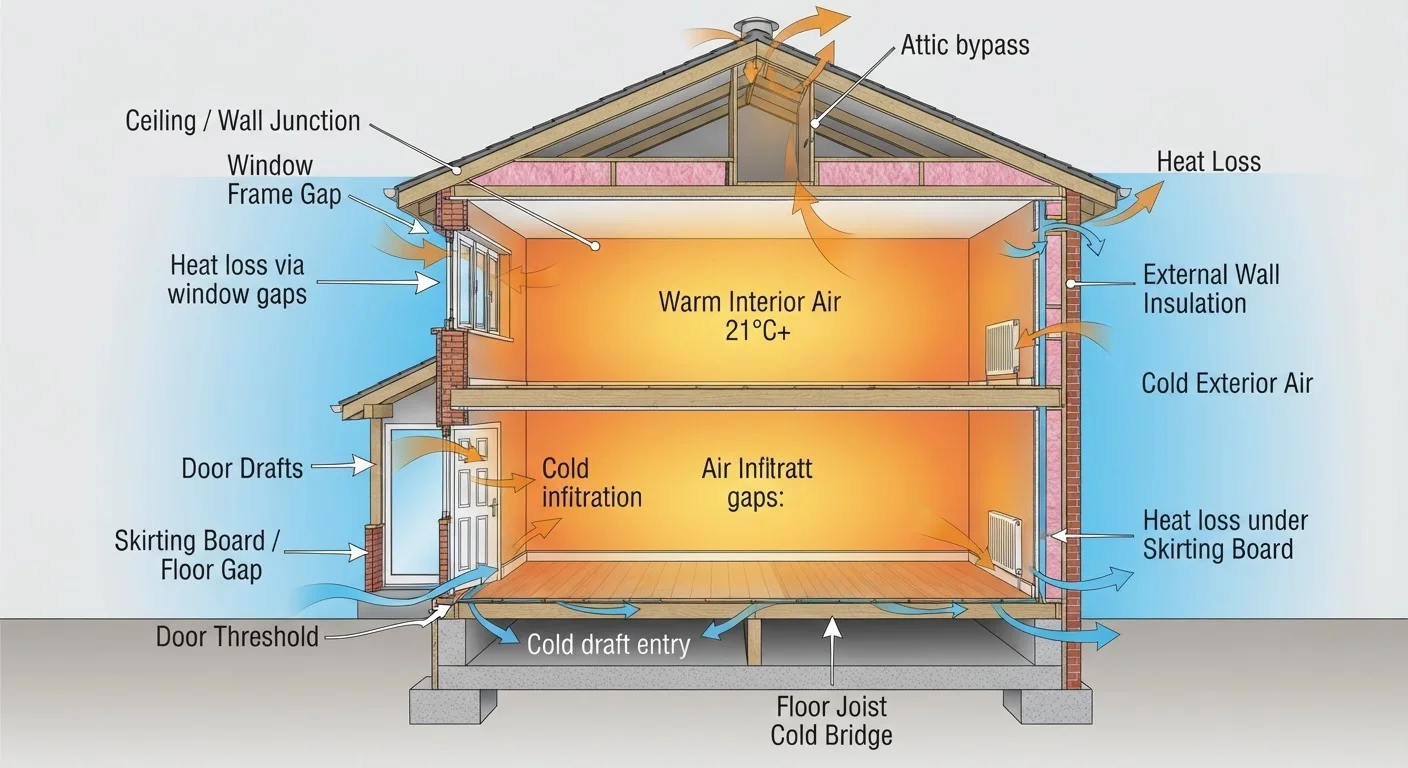
Doors, windows, loft hatches, and skirting boards — learn where thermal weak points commonly hide and how to address them without major work.
Key takeaways
- Gaps around doors, windows, loft hatches, and skirting boards are the most common sources of heat loss in homes.
- Most draught-proofing fixes require only basic tools and low-cost materials available at hardware stores.
- Addressing draughts before the heating season can meaningfully reduce energy consumption over winter.
- Ventilation still matters — some gaps serve a purpose and should not be sealed.
- A systematic room-by-room inspection is more effective than fixing visible gaps at random.
Where Heat Actually Escapes
Most homeowners assume double glazing and loft insulation are all that stand between them and a warm house. In practice, a significant portion of heat loss occurs through small, overlooked gaps that add up to a surprisingly large total area. Think of it like leaving a window open all winter — just distributed across a dozen different spots.
The most common culprits are:
- Exterior doors: The gap at the bottom of an exterior door is often the single largest draught source in a home. Even a 3–4mm gap across a standard door width allows significant air movement.
- Window frames: Old or poorly fitted frames develop gaps between the frame and the surrounding wall over time as materials expand, contract, and settle.
- Loft hatches: Rarely insulated and often poorly fitted, loft hatches allow warm air to rise directly into an unheated attic space.
- Skirting boards and floorboards: Particularly in older homes, the gap between skirting boards and floors — and between individual floorboards — allows cold air from underfloor voids to enter living spaces.
- Pipework entry points: Where pipes pass through external walls or floors, the surrounding gap is often left unsealed.
- Letterboxes and keyholes: Both are direct holes through the door with no thermal resistance unless fitted with covers or brushes.
This pattern of small losses adding up mirrors a wider principle worth understanding — our guide to small financial leaks explores the same logic in a different context. Addressing several modest sources of loss produces a more meaningful result than fixing one obvious problem.
Use the Incense Stick Test
On a cold, windy day, hold a lit incense stick near suspected draught points. If the smoke wavers sideways or gets pulled sharply in one direction, you've found a gap. Work methodically around each room, paying special attention to the edges of door and window frames, electrical outlets on exterior walls, and the join between skirting boards and the floor.
What You'll Need Before You Start
Draught-proofing is one of the more accessible home improvement tasks — it requires no specialist skills, no permits, and relatively modest materials. That said, choosing the right product for each location matters.
Self-adhesive foam strip
Applied to the rebates of door and window frames to create a compression seal when closed.
Door brush strip or threshold seal
Fitted to the bottom of exterior doors to block the gap between door and floor.
Silicone or acrylic caulk
Used to fill static gaps around window frames, skirting boards, and pipe entry points.
Caulk gun
Holds the caulk cartridge and controls the flow for neat, even application.
Filling knife or putty knife
Helps press caulk or filler into gaps and smooth the surface flush.
Incense sticks or smoke pen
Used to detect air movement and locate draught sources before sealing.
Loft hatch insulation kit
Adds foam edge seals and insulation board to an uninsulated loft hatch door.
What you will need
Before purchasing anything, walk through each room and note every suspected gap. Buying materials for specific locations prevents waste and ensures you have the right type of sealant — flexible silicone for joints that move slightly with temperature changes, foam strips for door and window rebates, and brush seals for the base of doors.
It's also worth reading up on common renovation myths before starting — some popular draught-proofing shortcuts don't perform as well as advertised.
Don't Seal Intentional Ventilation Points
Some openings in a home are deliberate — air bricks, trickle vents above windows, and underfloor ventilation gaps exist to prevent condensation and maintain safe combustion for gas appliances. Blocking these can cause damp, mould, or dangerous carbon monoxide buildup. If you're unsure whether a gap is structural ventilation, consult a qualified professional before sealing it.
Step-by-Step: Sealing the Main Draught Points
Work room by room, starting with the ground floor and exterior-facing surfaces. Complete each location fully before moving to the next — partially sealed gaps can redirect air rather than stopping it.
Inspect and map all draught locations
On a cold, windy day, move through each room systematically and note every gap, crack, or unsealed penetration. Check around all door frames, window frames, skirting board joins, pipe entry points, and the loft hatch. Mark locations with low-tack tape or write a simple room-by-room list. This map will guide your materials purchase and prevent missed spots.
Seal exterior door frames and letterboxes
Cut self-adhesive foam or rubber strip to length and apply it to the rebate — the channel inside the door frame that the door closes against. Press firmly for full adhesion. For the door base, fit a brush strip or drop-down threshold seal according to the manufacturer's instructions; most attach with screws along the bottom edge of the door. Fit an internal flap or brush cover to the letterbox, and a keyhole cover to the front of the lock.
Caulk gaps around window frames and skirting boards
Load a cartridge of flexible acrylic or silicone caulk into a caulk gun. Cut the nozzle at a shallow angle to produce a bead sized to the gap. Run a continuous bead along the joint between the window frame and the wall, or between the skirting board and the floor. Smooth the bead with a damp finger or filling knife within a few minutes before it skins over. Allow the full cure time stated on the product before painting over acrylic caulk.
Address the loft hatch
The loft hatch is often the most neglected draught source. Apply self-adhesive foam strip around the hatch frame so the hatch door compresses against it when closed. If the hatch board itself is thin and uninsulated, fix a layer of rigid insulation board (such as foam board) to the top face — the side that faces into the loft — using appropriate adhesive or screws with washers. Aim for at least 100mm of insulation thickness to match minimum recommended standards.
Seal pipe and cable entry points
Where pipes or cables pass through external walls or floors, fill the gap around them with flexible sealant — silicone works well here because it accommodates slight pipe movement. For larger gaps around waste pipes or soil stacks, use an expandable foam filler, but apply it sparingly as it expands considerably. Trim any excess once cured. Avoid using rigid filler around pipes that carry hot water, as expansion and contraction will crack it.
Check and test your work
Once all identified gaps are sealed and materials are fully cured, repeat the incense stick or smoke test from your initial inspection. Move through each treated location and verify that smoke rises straight — indicating no air movement. Pay attention to areas where multiple fixes meet, such as the corner where a door frame meets the skirting board. Address any remaining movement before the heating season begins.
Once you've addressed the main sources, consider adding draught-proofing to your seasonal maintenance calendar so that seals and strips get checked annually before winter. Materials degrade over time and benefit from periodic replacement.
Chimneys and Flues Need Special Attention
An unused chimney can account for significant heat loss, but you must not seal a chimney that is still in use or connected to a working gas appliance. Only block a chimney after confirming it is decommissioned — a chimney balloon or removable draught excluder is safer than a permanent seal, since it can be removed if the fireplace is used again.
What Draught-Proofing Won't Fix
Draught-proofing addresses infiltration — air moving through gaps — but it doesn't compensate for poor thermal insulation in walls, floors, or ceilings. If a room feels cold even after sealing all visible gaps, the issue may be conductive heat loss through the fabric of the wall itself rather than air movement.
Similarly, if you've recently opened up the floor plan of your home, you may find that heating patterns have shifted in unexpected ways. Our article on open-plan renovation trade-offs covers how structural changes affect heating and airflow in ways worth anticipating.
Finally, draught-proofing works best as part of a layered approach. A well-sealed home with poor ventilation creates its own problems — condensation and poor indoor air quality are real risks if the balance tips too far. The goal is a controlled, efficient home, not an airtight one.
All published content on this website is for informational and educational purposes only and should not be taken as professional advice. We recommend that readers seek expert opinion before making any decisions. The website is not responsible for any actions taken based on the information provided on this website. We are not liable for any inaccuracies, modifications, or omissions in information. Moreover, external links or third-party content are provided for convenience; we are not liable for their correctness. Users are advised to verify every piece of information before they use it for any purpose.